Last updated on June 29th, 2020
You might want to record videos of your Mac’s screen. It is really easy to record a video on your mac while something is happening on your Mac. Here is a step by step guide on how to record your screen on Mac.
Macs have this feature built-in, letting you record part or all of your screen. It also lets you record external audio — anything coming in through your mic.
You can record screen through QuickTime Player for all versions of macOS up to Mojave, but in a newer version of macOS (Mojave and Catalina), you can record through a screenshot app.
To record the screen on your mac in macOS Mojave or Catalina:
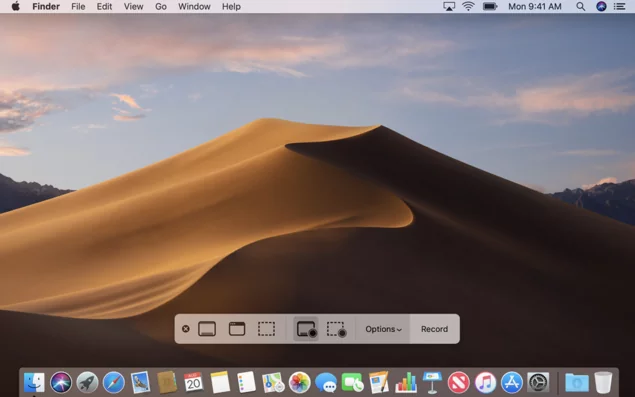
- Open the screenshot toolbar by pressing Command + Shift + 5.
- A control bar will appear at the bottom of your screen. You can use it for capturing a screen or for recording a video of your screen.
- Click on “Options” to set your preferences. For example, You can switch on your microphone, set a timer, and choose where the recording will be saved.
- To record the whole screen, click on the button that shows a screen with a solid outline and a circle in the corner.
- To record a section of your screen, click on the button that shows a screen with a dotted outline and a circle in the corner. Part of your screen will be highlighted and you’ll see dotted lines marking what you’ll be recording. You can resize or move that window.
- When you’re ready, click “Record.” If you’re recording your whole screen, you can click anywhere on the screen to start recording.
- If you have more than one screen click and hold on the Record button and you will see options Screen 1 and Screen 2.
- To stop recording, you can either press the stop button in the right corner of the menu bar at the top of the screen or press Command + Control + Esc. You can also press Command + Shift + 5 to pull up the Screenshot bar at the bottom of the screen and hit the stop button in the center of that bar.
To record the screen on your Mac with QuickTime Player
If you have macOS Mojave or earlier, you can use QuickTime Player to record your screen.
- Open up QuickTime Player.
- Click on File in the top menu (or, if QuickTime is in your dock, right-click on the icon) and select “New Screen Recording.”
- You’ll get a pop-up window labeled “Screen Recording.” Click the arrow next to the record button for recording options, like choosing to record audio from your computer’s external mic or to show your mouse clicks.
- Click the red record button.
- To record the entire screen, click anywhere on the screen.
- To record a section of the screen, click and drag the cursor to create a window (you can resize or move it if you wish) and then click the “Start Recording” button in the middle of that window.
- To stop recording, either click on the stop button in your top menu bar or press Command + Control + Esc.
- Either way, QuickTime will open the video for you to view and edit.